Category Archives: Photo Manipulation

Perfect Desktop Wallpaper – Photo manipulation in Photoshop
Hi all,
Here is a quick tutorial on Photo manipulation, hope it will help you.

Final result
Download source images – http://www.zumodrive.com/share/dfReNjhlNm
- Open image_01.jpg in Photoshop, copy and paste image_02.jpg.
- Add or erase unwanted part from image, only keep left mountain as shown in the image.

- Add image_03.jpg (cloud) on the top and change the blending mode to “Luminosity” and opacity to 80%. Erase bottom part with soft brush to merge with the composition as show in the image.

- By using Lasso selection tool or pen tool make a selection of the statue, to merge with the composition use “Grass brush” to eraser bottom part.
- Select brush tool and paint some shadow to the bottom left of the statue.

- River painted with the brush (I draw the shape with Lasso tool and painted over that with brush) composition will look something like this –

- Create new layer and use Elliptical marquee tool to draw moon, duplicate the layer and add Gaussian Blur (as per the requirement) I keep 8 radius. Change the blur layer mode to Linear Dodge (Add) and decrease opacity to 80%.

- By using soft big brush I added haze. For waterfall I choose small brush and painted on new layer.
 ‘
‘

- Time for using Adjustment layer, rather than explaining each of them following image will tell you in detail.


- Composition will look like this –

- Painted some birds to add life in the composition –

- Press CTRL+A and then CTRL+SHIFT+C for Copy merged, press CTRL+V for paste on the top of every layer.
- Press CTRL+J twice it will add two duplicate layer.
- Select top layer then go to Filter – Blur – Gaussian Blur, keep radius 8.0 pixel. Change blending mode to Soft Light and decrease opacity to 40%.

- Select bottom layer (2nd in stacking order) go to Filter – Other – High Pass

- Create a new blank layer add white color then go to Filter – Lense Corrections and keep the value as below. Change blending mode to Multiply and opacity to 50%.

- Final result will look something like this!

Let me know if you have any query and please do let me know your suggestion and feedback on my tutorial. 🙂
Thank you,
Adhir S. Pandit
Create a beautiful dreamy effect in photoshop
Today we will be taking an ordinary photo and converting it to a more dreamy one. This is a beginners tutorial. I have used photoshop cs5.
Source used:
Final image preview

Step 1
Open the girl image. Duplicate the background image. Select the spot healing brush tool. Select a small brush size , Now click on the spots/pimples. (to remove the marks on her face)

Step 2
Using dodge tool with 9% exposure, dodge the area just below the chin. (I have shown the area by arrows).
Step 3
Choose any selection tool and select the face as shown. Copy paste the selection on a new layer. 
Step 4
Go to filter>blur>gaussian blur. Set the value as shown below. After gaussian blur, change the opacity of this layer to 50%. (to avoid more blurriness).
Also, I added layer mask to remove the blurriness on the eye and eye brow.

Step 5
Right click the layer—choose blending options> color overlay. The settings are as shown.

Step 6
Now create a new layer, paint with a black soft brush (to darken) with 10% opacity.
Similarly create a new layer again and paint with a soft white brush with 10% opacity in the centre of the background(to lighten).
I have shown by arrows the areas to be lightened and darkened.
Step 7
Download pixies brush from obsidiandawn.com
Select the pixie brush “reaching” and click once using d1ceba color brush. Its shown below.
Step 8
Apply outer glow to the pixie. Settings are as shown.
Step 9
Download Glitter brush from obsidiandawn.com
Choose pixie swirl brush and click once as shown.

Step 10
Apply outer glow.

Step 11
From the glitter brushes, select “spray” brush and click once and apply outer glow. The settings for outer glow are the same.
Step 12
Apply vibrance. Settings are as shown. Note that I am using photoshop cs5 version.
Earlier I used cs2 version. This option was not present in cs2 version.
Step 13
Apply color balance.

Step 14
Apply photo filter.

FINAL IMAGE
Hope u loved it. 🙂 😉
Create a beautiful photo manipulation this mothers day
Today we will create a beautiful photo manipulation. The theme is “Mothers day” which is on May 8th 🙂 So lets start !!
Sources used:
SKY
MOTHER
Final image preview:

Step 1
Open the mother statue image. Using any selection tool extract the statue. I have used the pen tool.


The statue with the background removed.
Step 2
How to make rain
Now create a new layer and fill with black.

Add noise

Adjust levels

Apply motion blur

Change the blending mode to screen
Now u have finished making rain! 😉
Now ur image looks like this–after adding the sky layer too.

Step 3
Now select the statue layer. Go to image>adjustments>match color
Set the values as shown. Here we are trying to match the statue color with the sky color. 🙂
Make sure that under the “layer” option the sky layer is chosen. I have shown this by arrows.

Step 4
Now select the sky layer. Go to match color.
Set the values as shown. Here we are matching the sky color with statue. Make sure that under layer the staue image is selected.
It will be confusing when u read this. But when u work on these steps u will be able to understand what I mean 😉

Now ur image looks like this.

Apply hue/saturation

Apply color balance

Create a new layer. Paint highlights using white brush with 12% opacity.

Similarly paint shadows on a new layer using black brush with 12% opacity.

Apply brightness/contrast

Final image :
Hope u loved it 🙂 🙂
Create a ballerina using simple cut-paste techniques in Photoshop
This Photoshop tutorial, you will learn how to use a layer blending modes, and cut and paste techniques to create a photo manipulation. Combine your creativity with these Photoshop techniques to create your own photo manipulation artworks.
Final Image

Step 1:
First of all, create a new document. Mine is 1100px wide x 1100px high. Now our first task is to create a nice abstract background. To do this we’ll draw a radial gradient down using these two colors: #46701a to #000000.

Step 2:
Copy the background layer. Name it bg2. Change the layer blending mode to color dodge.

Step 3:
Take a new layer. Name it “clouds”. Change the foreground color to black and background color to white. Go to Filters-render-clouds.

Step 4:
Now go to Filters-Distort-Waves.
Number off generators: 5
Wavelength: Min. 93, Max. 256
Amplitude: Min. 1, Max. 75
Scale: horiz. 100%, Vert. 100%

Step 5:
Change the layer blending mode to Overlay. It will look something like this.

Step 6:
Take a new layer and paint it using brush tool, as shown below.

Step 7:
Change the layer blending mode to Color.

Step 8:
Place the “Venice mask” image on the new layer. Go to filter-distort-wave.

Step 9:
Change the layer blending mode to “Soft light”

Step 10:
Place the ballerina on a new layer. Name it “ballerina”.
Go to Layer-Layer style-Outer glow.

Step 11:
Make wings from “Venice mask”. Call this layer “wings”.

Step 12:
Place the wings behind ballerina. Go to Layer-Layer style-Outer glow.
Change the layer blending mode of the “wings” layer to luminosity.

Step 13:
Ctrl+click the “wings” layer. This will select the wings. Hide the “wings” layer. Take a new layer, name it “wings color”. Fill the selected area with #8e8d20.

Step 14:
Place “wings color” layer behind the “wings” layer.

Step 15:
Cut out the mask from “Venice mask”. Place it on the ballerina’s eyes. Change the layer blending mode to luminosity. Name this layers “eye-mask”

Step 16:
Ctrl+click the “eye-mask” layer. Hide the “eye-mask” layer
Take a new layer name it “eye-mask color”. Fill the selected area with #8fee57. Change the layer blending mode to linear burn.

Step 17
Place “eye-mask color” layer behind “eye-mask” layer.

Step 18:
Make ornaments for ballerina using the decoration in Venice mask

Step 19:
Make necklace, armlet and anklets

Step 20:
Merge all the layers. DONE
I hope you liked it 🙂
Create a concept scene using photomanipulation. “DARK CAVE”
Here we are going to create a concept background using images and some powerful photoshop tools . This is what we are going to create

using this image

Now open up this image in photoshop and get started .

Duplicate this layer ,and Go to image>Adjustments> Hue and Saturation(ctrl+U) and apply following adjustments

You will get this kinda result ,do some hit and trial with adjustments to get your own adjustments too .

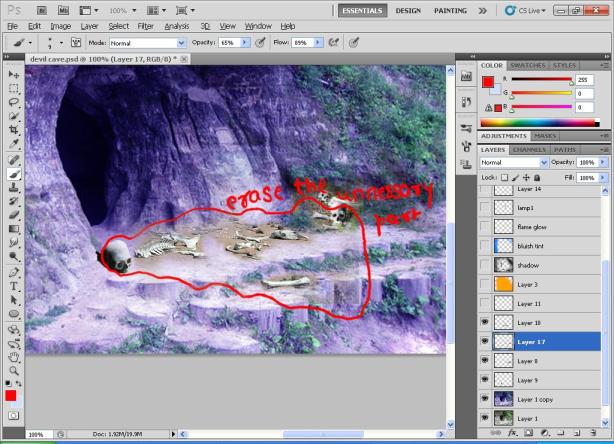
Now we will add some scattered bones to give it some freakish look .Google for images ,i chose these bones, no restriction you can add your own desired bones too .
Delete the undesired portion in picture so that you can get just bones nothing else .

Some more bones too… DON’T ADD TOO MUCH BONES because that will spoil the mood and give it a dramatic unrealistic look.
Now time to add some lighting and mood to our scene.Pick up soft brush

And choose this color to add yellowish light to our scene

Now start painting in desired area not everywhere because unnecessary color will make your file heavy and you will not get desired output.

Now change the setting of the layer to

Time to add some black shadows to give feeling of scary night .Pick up soft brush ,choose black color and start painting like shown below

Now we will add some bluish tint to give some light source through moon .

And give the following adjustments:

Now our lighting part is almost done , we will add one flame torch to give it contemporary look ..now pick up hard brush and start painting torch

Give some 3d look by adding some details through light tone of same color .

Now time to give some details to flame , pick up smudge tool and get started with some adjustments through brush , NO RESTRICTION TO CHOOSE BRUSH , u can use your own made brush to give a good look

After few strokes and adjustments you will get somewhat this kind of result

Now time to add shadows created by torch , pick up soft brush and black color and paint beneath the torch.

You will get this kinda result

This is it , we have finished our basic tutorial of creating such environment .You can create more realistic look just keep practicing .

HOPE YOU LIKED IT , ENJOY PHOTOSHOP!! 😀
Create a concept scenario using photomanipulation…”THE QUEST OF HIDDEN SECRETS”
Now we shall get started ….This is basic plot of concept , i drew a rough form of my idea and searched pics according to this and luckily i found on google images ”

After this i started placing my background which is a cave and i converted it into back and white images so that i can give it my own colors to give it a new feeling .

Now comes the skulls , as i mentioned the theme of this manipulation “HIDDEN SECRETS” , in this i’ll show skull bit larger than life . About 2-3 times bigger than the human scale .I’ll desaturate this image too so that i’ll match the background and suitable color can be applied with lighting .Then i’ll crop the required skulls and place it above the cave picture.

As i mentioned before , after desaturating and placing both pics in back and white form they will match in color so to give a feeling of same part .

Now the fun part begins, the lighting and coloring the images . I chose bit purple, blue and greenish tint to give it feels of mysterious place , as these colors depict something weird and mysterious .first i begin with purple color and blending mode to “MULTIPLY” with no changes in opacity throughout coloring sequences.

Now i painted bluish tint to it and changed blending mode to “SOFT LIGHT” this gives a good tint to environment .

Now i painted greenish color to give it more mystical look and changed blending mode to “MULTIPLY” , erase according to requirement because as you see green color ain’t applied everywhere.

Now the major part begins , pick up the soft round brush and start giving depth to skulls and cave to give shadows and depth .NO NEED to change blending mode or opacity.

Now duplicate the skull layer and place it over the black shadow layer ,and press and hold ctrl and now click on layer you duplicated , this will create a boundary of marching ants indicating you further adjustments with brush won’t spill out of that ,now pick up yellowish color of flame and press alt+backspace . This will fill your skull layer with yellowish flame color , now change blending mode to PIN LIGHT , this will enhance the color of skulls to yellow and showing as if some light is burning over that .. then apply mask to layer and start painting to layer with soft brush with black . concentrate on middle part of main skull and paint black shadows to father skull and give a sense of depth .

Now comes the explorer person in cave , i took a person from internet holding something in his hand and i drew flame and gave him a look of contemporary explorer.

Now time to give some glow to his flame torch …use yellow light and use soft brush to give that look .no blending option , just manage opacity while painting , lower will be opacity as light goes far from flame and dense near flame .

Now the simple step , press ctrl+M to open curves to manage the sharpness of character and distinguish it from background .
Hope you liked it . Have Fun with photoshop . 🙂
